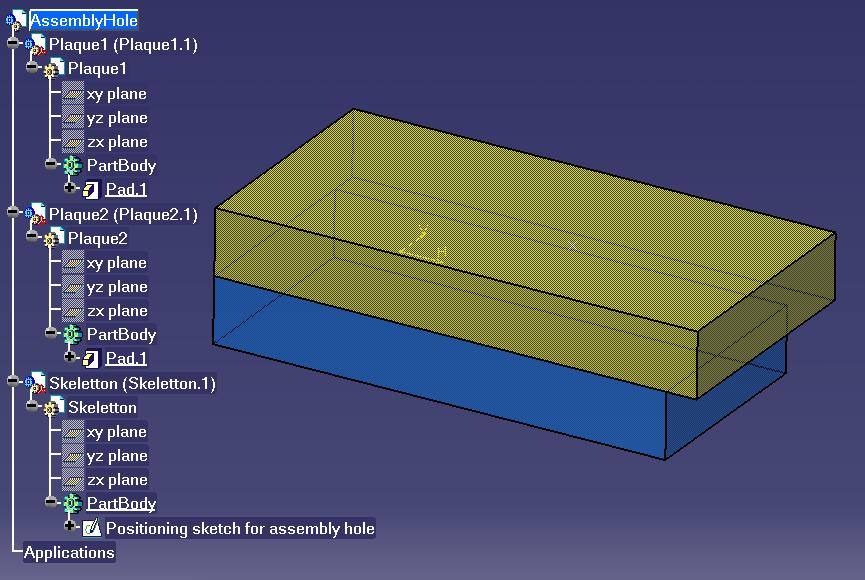
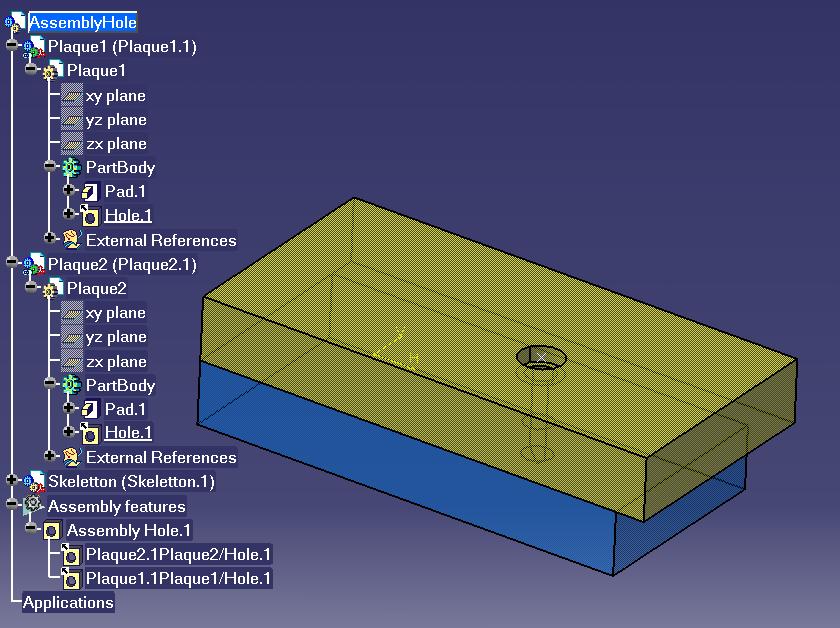
This macro shows you how to create an assembly hole and valuate its parameters.
This macro opens the AssemblyHole.CATProduct
document that contains three parts: a skeletton, Skeletton.CATPart, and
two plates, Plaque1.CATPart and Plaque2.CATPart.
It retrieves each Product
object corresponding to the product instances in the assembly and the Sketch
object which will define the position of the assembly hole. It creates an AssemblyHole
object in the assembly. It sets the main parameters of the new AssemblyHole
object. To finish the whole assembly is updated.
CAAAsmCreateAssyHole is launched in CATIA [1]. No open document is needed.
CAAAsmCreateAssyHole.CATScript is located in the CAAScdAsmUseCases module. Execute macro (Windows only).
CAAAsmCreateAssyHole includes the following steps:
Prolog
The macro first loads AssemblyHole.CATProduct that contains three parts: a skeletton, Skeletton.CATPart, and two plates, Plaque1.CATPart and Plaque2.CATPart.

... ' -------------------------- ' Get the different products ' -------------------------- Dim oRootProduct As Product Set oRootProduct = CATIA.ActiveDocument.Product Dim oSkeletton As Product Set oSkeletton = oRootProduct.Products.Item ( "Skeletton.1" ) Dim oPlaque1 As Product Set oPlaque1 = oRootProduct.Products.Item ( "Plaque1.1" ) Dim oPlaque2 As Product Set oPlaque2 = oRootProduct.Products.Item ( "Plaque2.1" ) ... |
Once the product document has been loaded, the oSkeletton,
oPlaque1 and oPlaque2 variables are declared to
receive the instances of Skeletton, Plaque1 and Plaque2. Those instances
are fetched in the Products collection [2]
of the root Product [2] using their
names.
...
' -----------------------------------------
' Get the positioning sketch to create hole
' -----------------------------------------

Dim oSkelDocument As PartDocument
Set oSkelDocument = CATIA.Documents.Item("Skeletton.CATPart")

Dim oBody As Body
Set oBody = oSkelDocument.Part.Bodies.Item("PartBody")

Dim oPosSketch As Sketch
Set oPosSketch = oBody.Sketches.Item("Positioning sketch for assembly hole")
...
|
The oPosSketch object will be used to determine the
positioning point of the hole. The sketch only needs to contain one point.
Creating Assembly Hole.
...
' -----------------------------------------
' Get the AssemblyFeatures technical object
' -----------------------------------------

Dim oAssemblyFeatures As AssemblyFeatures
Set oAssemblyFeatures = oRootProduct.GetTechnologicalObject("AssemblyFeatures")

' -------------------------------------------------------------
' Create assembly hole
'   positioning sketch : oPosSketch
'   instance containing the positioning sketch : oSkeletton
'   instance defining the positioning of the hole : oSkeletton
'   depth : 10 mm
' -------------------------------------------------------------

Dim oAssemblyHole As AssemblyHole
Set oAssemblyHole = oAssemblyFeatures.AddAssemblyHole(oPosSketch, oSkeletton, 10.000000, oSkeletton)

' ------------------------------------------------------------
' Affects parts to the assembly hole : Plaque1.1 and Plaque2.1
' ------------------------------------------------------------

oAssemblyHole.AddAffectedComponent oPlaque1
oAssemblyHole.AddAffectedComponent oPlaque2
...
|
The AssemblyFeatures collection [2] oAssemblyFeatures
is retrieved from the root Product using the method GetTechnologicalObject.
This object allows you to retrieve all the assembly features of oRootProduct
and to create new ones.
A new AssemblyHole object [2] is
created using the AddAssemblyHole method.
The first and second arguments define the positioning Sketch [2] and one Product containing it; is could be any instance of Skeletton.CATPart. The third argument is the depth of the hole as a double. The fourth argument is a Product instance of Skeletton.CATPart defining the real position of the hole in the assembly context.
The two product Plaque1.1 and Plaque2.1 are affected using the AddAffectedComponent
method.
Setting Assembly Hole parameters
... ' -------------------------------------------- ' modify the hole parameters ' - diameter 10 mm ' - counterbored ' - V-bottom ' - length ' -------------------------------------------- Dim oDiameter As Length Set oDiameter = oAssemblyHole.Diameter oDiameter.Value = 10.000000 oAssemblyHole.Type = catCounterboredHole oAssemblyHole.AnchorMode = catExtremPointHoleAnchor Dim oHeadDiameter As Length Set oHeadDiameter = oAssemblyHole.HeadDiameter oHeadDiameter.Value = 15.000000 Dim oHeadDepth As Length Set oHeadDepth = oAssemblyHole.HeadDepth oHeadDepth.Value = 5.000000 Dim oBottomLimit As Limit Set oBottomLimit = oAssemblyHole.BottomLimit oBottomLimit.LimitMode = catOffsetLimit Dim oDepth As Length Set oDepth = oBottomLimit.Dimension oDepth.Value = 30.000000 oAssemblyHole.BottomType = catVHoleBottom Dim oBottomAngle As Angle Set oBottomAngle = oAssemblyHole.BottomAngle oBottomAngle.Value = 120.000000 ... |
The diameter of the hole is set using the Diameter
property and the Length object [2].
The type is set using Type property; hole types are
defined in the CatHoleType enum [2]. In
the case of a counter bored hole the anchor mode is set by AnchorMode;
hole anchor modes are defined in the CatHoleAnchorMode enum [2].
The head depth is valuated using HeadDiameter property and
the Length object.
The Limit is defined by BottomLimit property and Limit
object [2].
... ' -------------------------------------- ' Update the Product ' -------------------------------------- oRootProduct.Update ... |
The root Product is then updated; it propagates the Update to the affected parts so that the resulting holes appears in the CATParts.
