This macro is based on an active product document.
- Select File -> Printer Setup... then double-click Add Printer item in the Printers dialog box that appears.
- Select 3D PLM Printer in the Add Printer Wizard dialog box that appears and click OK.
- Define the printer properties:
- Name: Printer TIF
- Driver: Raster

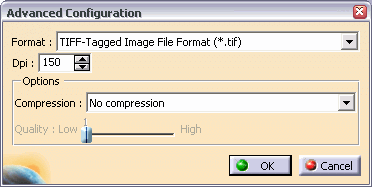
- Click the Advanced Configuration... button to define the
advanced configuration:
- Format: TIFF
- Dpi: 150
Run CAA2dlIPrint2DLayout in CATIA [1].
CAA2dlIPrint2DLayout is located in the CAA2dlUseCases module. Execute macro (Windows only).
- Prolog
- Retrieving the Part
- Retrieving the 2D Layout
- Retrieving the Sheet
- Printing the 2D Layout
- Printing in Part Context
- Printing in Product Context
- In Short
Prolog
...
  ' Define the application default printer
  CATIA.ActivePrinter = CATIA.Printers.Item("Printer TIF")
  Dim oDocument As Document
  ' Retrieve the active document
  Set oDocument = CATIA.ActiveDocument
  ' Look for the document type, if it is not a product document the macro stops
  If TypeName(oDocument) = "ProductDocument" Then
    Dim oProductDocument As ProductDocument
    Set oProductDocument = oDocument
  Else
    MsgBox "This macro can be run with a product document only."
    Exit Sub
  End If
  ' Call the procedure to search the parts in document
  Call SearchPartsInProduct(oProductDocument.Product)
...
|
The "Printer TIF" printer previously defined is set as active printer in the application.
The active document type is tested. If it is a ProductDocument,
the oProductDocument is retrieved from the oDocument.
Otherwise the macro stops and prompts a warning message.
The SearchPartsInProduct procedure is called to search
recursively parts in the product structure.
Retrieving a Part
...
  ' Search for the parts in the product structure
  For Each oProduct In ProductParent.Products
    ' Look for product children
    If oProduct.Products.Count <> 0 Then
      ' Call the procedure to search the parts in document
      Call SearchPartsInProduct(oProduct)
    Else
      ' Retrieve the reference product
      Set oProductReference = oProduct.ReferenceProduct
      ' Look for the product existence
      If Not oProductReference Is Nothing Then
          ' Look for the product shape representation
          If oProduct.HasAMasterShapeRepresentation Then
            ' Retrieve the shape representation
            Set oShapeRepresentation = oProduct.GetMasterShapeRepresentation(False)
            ' Look for the shape representation document type
            If Right(oShapeRepresentation.Name, 7) = "CATPart" Then
              ' Retrieve the part
              Set oPart = oShapeRepresentation.Part
...
|
We look for the part according to the product structure, for this we
know that: a part is contained in a product and this product does not
contain any product itself.
The oProduct object is retrieved
from the Products collection of the ProductParent
object.
So, when the product collection contains product objects (its
Count property differs from zero) this indicates that there is no
part under this product level, otherwise when the product collection is
empty (its Count property equals to zero) this indicates that
we might find a part, but not necessarily.
For this, we look for shape representation existence in the product
object and for more security in its product reference.
The HasAMasterShapeRepresentation and the
GetMasterShapeRepresentation functions are retrieved from the
oProduct object.
Finally, we have to check that the file extension of the shape
representation is CATPart indicating a part.
The file extension is retrieved from the Name property of the
oShapeRepresentation object.
The oPart object is retrieved from the Part
object of the oShapeRepresentation object.
Retrieving the 2D Layout
...

              ' Retrieve the 2D Layout
              Set oLayout2DRoot = oPart.GetItem("CATLayoutRoot")

...
|
The oLayout2DRoot object is retrieved from the
GetItem function of the oPart object using the
CATLayoutRoot string argument.
Retrieving the Sheet
...
              ' Look for the 2D Layout existence
              If Not oLayout2DRoot Is Nothing Then
                ' Retrieve the sheet collection
                Set oLayout2DSheets = oLayout2DRoot.Sheets
                ' Retrieve the sheets contained in the collection
                For iSheet = 1 To oLayout2DSheets.Count
                  ' Retrieve the sheet
                  Set oLayout2DSheet = oLayout2DSheets.Item(iSheet)
...
|
The oLayout2DRoot object is checked: when the object is
empty, there is no layout in the part.
The oLayout2DSheet object is retrieved from the Sheets
collection of the oLayout2DRoot object.
Printing the 2D Layout
...
                  ' Print the sheet in a TIFF file
                  oLayout2DSheet.PrintToFile "F:\tmp\2D3DDesign\print\" + oLayout2DSheet.Name + ".tif", _
                    catRenderQuickHiddenLinesRemovalWithHiddenEdgesWithOutlinesWithoutVertices
...
|
The layout is printed using the PrintToFile method from the
oLayout2DSheet object with a specified file path and name, and
the
catRenderQuickHiddenLinesRemovalWithHiddenEdgesWithOutlinesWithoutVertices
enumerate argument.
Printing in Part Context
Note that the print context, part or product, depends of the following conditions:
- Product context:
- a 2D layout window is opened,
- this 2D layout window is the active window in the application,
- the sheet displayed in this 2D layout window and the printed sheet belong to the same layout.
- Part context: when one of the previous conditions is not respected.
- Open the product document only: Assembly-2DL.CATProduct
- Run the macro.
- The resulting image file looks like this: Sheet.1.tif
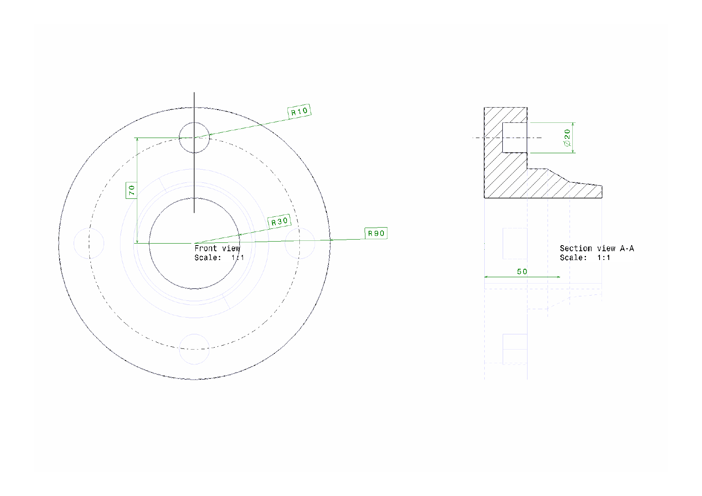
Note that only the part is printed in the backgrounds.
Printing in Product Context
- Edit the 2D layout by double-clicking the Layout feature in the product: the 2D layout window appears.
- Be sure that this 2D layout window is the active window and re-run the macro.
- The resulting image file looks like this: Sheet.1.tif
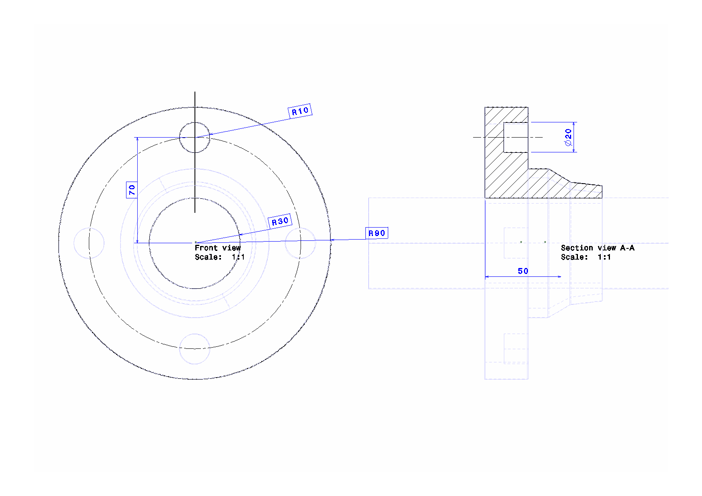
Note that all the product structure is printed in the backgrounds.